Making Shelf Boxes from Plexiglass
After building the ratty grotto and annex, the biggest problem turned out to be how to keep the shelves clean. My ratties did not get the litter box concept at all, which isn’t too kind on the nose. I tried fabric liners
that were velcroed on that I could throw in the washer, but Hoot made it her mission in life to pull them up. Then I tried litter which worked well with odor control but was really messy and hard to change.
 I stumbled upon an idea—make a plexiglass "box" for each shelf.
It would be exactly the size of the shelf so that there would be no peeing or litter spilling over the side walls. Cleaning would be easy because I could just lift a box out, dump the litter, clean the box in the bathtub, replace the litter, and off we go.
I found a great website called Tap Plastics that has lots of instructional videos. The one that got my psyched up was this one (warning, their catchy tune sticks in your head):
How to Build a Box with Plastic
Getting the Plexiglass
(By the way, I know that plexiglas is spelled with one s, but anyone who knows that probably wouldn’t need to find this post on the internet, so I’m going to spell it incorrectly for search engine purposes.)
The biggest problem was where to buy enough plexiglass from. I wanted 1/4" because it is easier to work with than the 1/8" you find at Home Depot. After reading a thread about someone who made plexiglass shelves with material from a local plastics place, I Googled and found somewhere pretty close. I gave my sizes. For each shelf:
22.5" x 9.25" (the floor)
2 pieces of 22.5" x 3.5" (the long sides)
2 pieces of 8.75" x 3.5" (the short sides, 9.25 minus the width of the plexiglass from the long sides)
Nothing fancy, but the quote came to $48.00! Per box!!!
Ok, that’s not going to work. Next I found a website that makes plastic display boxes for museums. Ok, I thought, they’re already set up to make boxes so it should be cheap. But they wanted $129.00 per box. Yikes!!!
I was ready to abandon the idea until I found someone on Craigslist who had three sheets of plexiglass for $60.00 each. The sheets were 83" x 33". I figured out that’s enough to do five shelves of the grotto. Good enough; I’ll worry about the remaining grotto shelf and the two annex shelves some other time. (Since then I’ve also seen plexiglass on eBay, so good deals are out there. You can also order large sheets online).
Deciding How to Cut the Plexiglass
Tap has a video on cutting plexiglass:
How to Cut Plexiglass
Here’s what I learned:
For 1/8", use the score and snap method. (I’ve done this before and it works ok). But for 1/4" or thicker, you really need a table saw. You need a really straight edge which I’ll get to later.
If you live on the west coast, you may be fortunate enough to have a Tap Plastics store near you. Trust me, you’ll save yourself a lot of work later if you just have them cut it. It might be cheaper to buy the plastic from them as well; I don’t know, I live in Massachusetts.
I called the plastics place that quoted me $48.00 for the pieces and asked them how much if I bring them my sheet and they cut it for me. He said $20 – $40. But he said something that made me nervous—they would use score and snap for the 1/4" and some of my small pieces would be problematic. So I thanked him and decided to cut it myself.
It was a good excuse to buy a table saw which I’ve always wanted. Back to Craigslist where I found a killer-good deal. $50.00 for a Hitachi table saw. It was a really low-end model and the contractor who was selling it said it wasn’t stable enough (yup, it tried to tip on us while we were cutting), but for my purposes it was perfect. And it was small enough (and on wheels) so I could easily store it in the shed.
So, armed with my new power tool, I started.
Making a Pattern
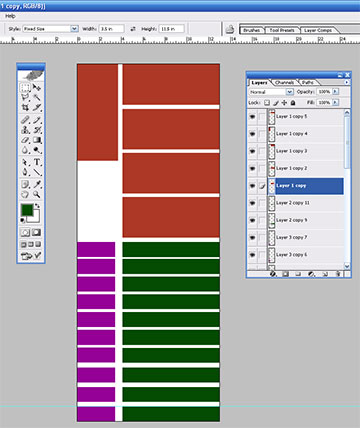
I wanted to get the most pieces possible on the sheet. So I created a new document using Photoshop that was 83" x 33". Then for each piece I needed:
- I created a new layer.
- I clicked on the marquee tool and selected Fixed Size. Then I typed in the size of the piece.
- I used the marquee to create a selection box on the layer (make sure that feather is set to 0.)
- I typed Ctrl Backspace which fills the box with the foreground color.
Hint: once you have a layer with a certain size piece, just duplicate the layer by dragging it to the new layer icon.
Why did I create a new layer for each piece? Because (with Auto Select Layer turned on), I could select the Move tool and then drag each piece. I could also rotate pieces (Edit/Transform/Rotate 90 degrees). But since this isn’t a Photoshop lesson, I’ll leave it at that.
Another tip: make sure you leave a little space between each piece to account for the blade of your table saw.
Cutting the Plexiglass
I read lots of posts on different forums about this. Tap Plastics says to use a triple tooth carbide blade, but I couldn’t find this at Home Depot. Instead I used a blade that I had for wood. I think it came with my mitre saw so it’s nothing special. But it is a carbide blade and it does have few teeth: 40. The forums agree that the teeth should be 40 – 60.
Now normally you turn a blade backwards to cut plastic. I used this technique to cut vinyl siding with my mitre saw and it worked great. But my experience is NOT to do this for the plexiglass. When I turned the blade backwards, the plexiglass melted when I cut it. But when I used the blade forward, it worked fine. Some posts also say to spray the blade or plexiglass with water and put a piece of plywood on top of it, but I didn’t do either of these things.
The actual cutting was the hardest part of all. Since the plexiglass is very flexible compared to wood, it kept bowing as we tried to cut. There were two of us; one to push the plexiglass toward the blade and another to stand on the side and push it against the table saw guide, but it still bowed. Remember we’re talking about a sheet that’s 83" long. So instead I used my circular saw to cut the huge piece in half. Then the smaller half was easier to cut on the table saw. Just make sure you measure so that you don’t cut it in half in the wrong place.
 A word about melting: it doesn’t mean you get a goopy mess. It just means that after you finish cutting, you notice really odd debris left behind on the piece. It looks like cotton candy but it’s already hard. I also had lots of "cotton candy" in the innards of my table saw.
Here’s something else I found. You really need to guide the piece on both sides of the blade. When I was cutting some of the more manageable pieces alone, I was standing on the side of the table saw, both pulling the piece along the blade and pushing it against the guide. When I got about 2/3 of the way through the cut, I noticed an increase in resistance. That’s because the flexible plastic was pinching the blade. The result was that it wasn’t a smooth cut and I had to recut the pieces. You’ll notice in the Tap Plastics video on how to cut that the guy uses a hand on each side. Just be careful of kickback.
Another tip: the video says to adjust the blade so that it is just barely higher than the piece, but I found that due to the bowing of the plexiglass I had to make the blade higher so that it would continue to cut through.
Checking the Pieces
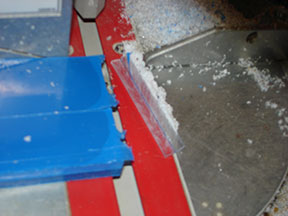
As I mentioned before, you really need a straight cut and a true 90 degree angle with the side edges in order for the gluing step to work properly. One way to check your cut: stand your piece on its long edge on a table or another flat surface. If you can see light at the bottom, you have too big a gap. You can also take the corner of an envelope or postcard (at last, a handy use for junk mail!) and try to push it under the edge. If it goes through, you have too big a gap.
But not to worry. I had quite a few pieces like that and it just meant I had to seal them later.
Gluing the Pieces
This was one thing that sold me on the idea of using plexiglass in the first place. You don’t actually glue the pieces together. Instead you use something called plexiglass cement. It is the same consistency as water and it melts the two pieces together, then evaporates. This means you’re left with a solid piece of plastic and no chemicals. I liked the idea that my ratties would have nothing harmful to chew on.
Back to the catchy Tap Plastics tune:
How to Glue Acrylic
(By the way, acrylic is the generic term and plexiglas is a brand, like tissues and kleenex.)
Gluing my box together really was as easy as shown in the video and the most fun. The hard part was finding what I needed.
Plexiglass cement isn’t that hard to find on the internet. Just Google Weld-on 3. Tap Plastics also sells this and some of their own brand. But since it is considered a hazardous material, it can only be ground-shipped. I wanted to complete my project as quickly as possible, so I started calling around to find it.
I called plastic places, glass places, and hardward stores. Nobody had any. Finally I stumbled upon a local company that manufactures plexiglass things. They gave me a bottle for free. (By the way, 4-6 ounces is plenty for most projects). They even took me in the back and showed me how to use it on some scrap plastic. Here’s an unsolicited endorsement: if you’re a business and you need something made of plexiglass, try Dan-Kar Plastics Manufacturers in Woburn, MA.
But they didn’t have any of the squeeze bottles shown in the Tap Plastics video. (Tap also sells it, but again I wasn’t willing to wait for it to come).
After calling all over creation, I bought something called a hobby syringe.
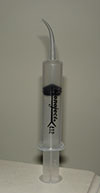
It cost less than $2. Here’s another tip: start with HobbyTown and see if they have a store near you. (Why HobbyTown doesn’t come up when I put "hobby store" in the white pages search, I have no idea.) If you don’t have one, look for a model train hobby store. They might even have the applicator bottle shown in the video. It’s called a needle-shaft or needle-tip applicator bottle.
The gluing process is really simple. Make sure you do what it shows in the video: you always want to glue so that the solvent is sitting on a flat surface. I recommend doing one piece at a time; don’t do both side walls at the same time.
So here’s what I did. I set up a working area in the garage (a spare piece of counter on top of a recycle bin).
I laid one of the long side pieces down and removed the protective blue sheeting on the upward facing side. Then I pulled an inch of protective sheeting away and cut it with a utility blade from one end of a side piece, both front and back.
Keep in mind that first you’re going to glue the sides of the box together, then you’re going to glue it to the floor. This means that the bottom edges of the walls must all be flush.
To position the two pieces exactly right, I tried two different things. Here’s the first technique I tried: I stood the side piece on its edge. I tried to get the two pieces flush, first by feeling the corner with my finger, and later by pressing the pieces against a scrap piece of plexiglass. But when I later glued the walls to the bottom, I could see that it wasn’t flush. (It may also be because my cuts weren’t totally straight).
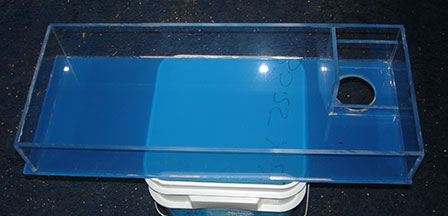
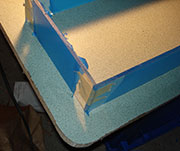 So then I did this instead: I stood all four walls on their bottom edges so that I formed the box without the bottom. It was resting on my counter which is level. I used some masking tape to hold the corner together. Then I very carefully tipped it up so that it was resting on one of the long walls. As long as it didn’t shift when I tipped it, the edges should all be flush. Then I glued. Since I had them all taped together, I did glue the two side walls on at the same time.
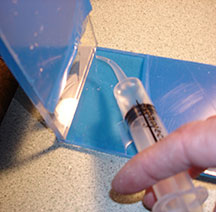 So here’s how you glue. You put some of the cement in the syringe. (One problem with the syringe is that it might not fit into the bottle to draw liquid up. I had to tip the bottle to get to the liquid, spilling some of it on my hands in the process. (A quick aside about the cement: I expected it to be nasty stuff. After all, it melts plastic! But it felt more like alcohol and it evaporated very quickly. In the Tap video, the man used gloves when he glued but when the good folks at Dan-Kar showed me how to use it, the woman actually applied it with her finger with no glove.)
Here’s a tip: get some air in the tip of the syringe. That way the liquid won’t spill as soon as you invert it and you have more control—it shouldn’t start coming out until you feed it up.
As you apply the liquid to the crack where the two pieces meet, capillary action draws it into the crack. You can see the joint change color as the liquid is drawn in the same way almost any material gets darker when it gets wet.
 I applied the cement to both sidewall joints, then I quickly used a carpenter’s square to make sure the corner was a right angle. You have about 10 seconds to move pieces around before they start to set. In about 30 – 40 seconds you can let go. After about 20 minutes the pieces are solid enough that you can flip it over and do the other two joints, but don’t put a lot of stress on it for a few hours.
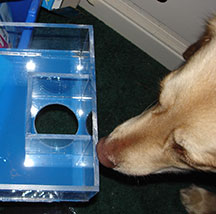
Cutting Holes in the Floor
If you’re using the boxes in a bookcase-style cage like I am, you’ll need to cut holes in the floor to match the holes in the shelves where the ratties get from shelf to shelf.
Do this before you glue the walls to the floor.
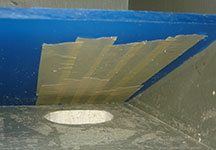
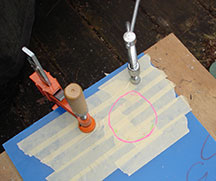
 First use masking tape (overlap the strips) to cover the approximate area on the bottom of the floor. (The tape serves two purposes: to let you draw easily on it and to keep the plexiglass from splitting when cutting.)
Then put the floor on the shelf and look from the shelf below it.
If you see any place that is missing tape, take the floor out and put more on. Then put the floor back in and use a magic marker to outline the hole on the bottom of the floor.
After you’ve drawn your opening, take the floor out and try to match the masking tape on the top of the floor. (One advantage of plexiglass is that you can see right through it to the mark you made).
Cutting the hole is a little tricky. If you want a square opening, you can try using a tool like a rotozip. I haven’t had a lot of luck making really straight edges with one. You can also drill a hole close to the edge of the mark that is bigger than a jigsaw blade. Then use a jigsaw to cut out the opening.
For me, I wanted my holes to be 2 1/2", so I used a hole saw.
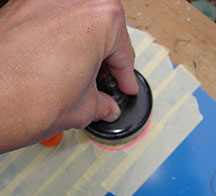 First I put a piece of plywood down and put the plexiglass floor on top. I clamped it all together, trying to get the clamps as close to the drawing as possible.
I pressed the center drill bit of the hole saw firmly onto the plexiglass so that it made a mark, making sure my hole saw was within my drawing. Then I used a drill bit to make a pilot hole at the mark. This might not be necessary but I read it on a forum. It’s to keep the plexiglass from splitting.
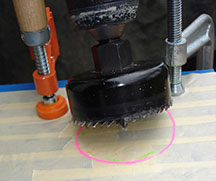
 When I started to drill, I put the drill bit part of the hole saw where the pilot hole was.
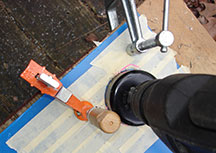
The trick to keep the plexiglass from melting as you make your hole is to go very slowly. One forum also recommended spraying the surface with water, but I didn’t do this. I just tried to squeeze my drill trigger as little as possible and still have it cut.
Tip: when you start to see sawdust instead of plastic schnibbles (my mother’s word), keep drilling. I kept thinking I was all the way through and stopped to check, but I wasn’t all the way around the hole.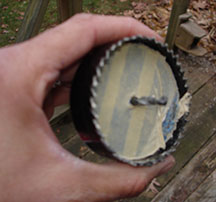 When you finish, you may have the plexiglass hole stuck in your hole saw. I read different ways to remove this but what worked for me was just to bang the hole saw against something like a spare piece of wood (after you remove it from your drill, of course). Each bang knocks the piece out a little more until it just pops out.
Put the floor on your shelf to make sure the opening is where you want it before you glue the sides on.
Gluing the Sides to the Floor
When you glue the sides to the floor, first remove the remaining protective blue sheeting from the walls and from the top of the floor. I leave the sheeting on the bottom of the floor— I like the blue color.
Make sure you start with a lot more liquid in your syringe than when you glued the walls together. As you glue, you’ll find whether your pieces are flush and your cuts are level.
As your syringe travels along where the walls meet the bottom, the liquid will travel slightly ahead of your syringe if your pieces are flat together. If you’ve left the protective cover on the bottom of the floor, it’s really easy to see this. But if you see that the liquid stops traveling and/or you notice the color is still white, you probably have a gap.
Sealing the Gaps
I had quite a few places where there were gaps. You might not care, but I wanted these boxes to be as waterproof as possible so that if my guys pee in the corners (as they often do), it will stay in the box.
To seal these gaps I used aquarium sealant. I figured if it’s non-toxic enough for fish, it would be fine for my guys. And I applied it to the outside of the box so they really shouldn’t be able to get at it from the inside anyway.
You don’t have to go to a specialized fish store for this; I found it as Ace Hardware. It is silicone-based and made for glass, but the Ace man told me it will work fine for acrylic.
Here’s a tip on applying caulk of any kind: first apply the caulk in the normal fashion. Then wet a corner of a paper towel. Put it over your finger and run it along the seal. It will make a nice, smooth finish.
I let the caulk dry a full 24 hours before putting the boxes in the grotto.
Making a Litter Guard Around the Opening
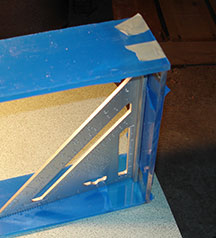
I put one more flourish on my box—a litter guard around the opening. This way the litter won’t spill through the hole to the shelf below.
 I used my spare bits of plexiglass to construct a little box around the hole. I stood the guard walls in their proper positions on the floor and taped the pieces together. Then I glued them to the floor. I don’t really care if the pieces are glued to each other or not.
Ta Da!
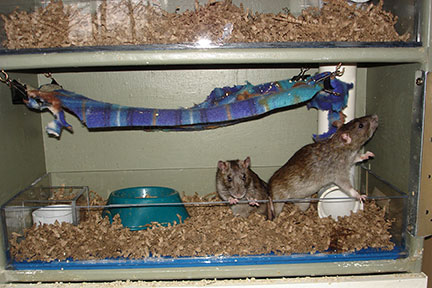 My shelf boxes were a big success. As of this writing, it’s been a few weeks. My guys have not chewed the walls at all (which surprised even me!).
The boxes are super easy to clean and they work really well at holding in the litter.
I like them so much that now I’m searching the web for another deal on plexiglass so I can makes boxes for the remaining shelf and the annex.
One thought on “Making Shelf Boxes from Plexiglass”
Dear Ratty Grotto builder,
I read your thorough and thoroughly enjoyable posting on building plexiglass boxes. You sound like you’ve become an expert and we need one. We have a model that we would like to donate to the Boston Children’s Hospital. It’s a model of a ski hill, labelled to show how the circulatory system works. (7th grade science project.) The skier goes up on the chairlift (venacava) to the heart at the top of the hill (lodge), connected to the lungs (snack bar). Then he skis down the hill (aorta) and through the capillaries (chairlift entrance) back up. Our model is 14x30x12h. The box should be slightly bigger. Since we are planning to donate this, we don’t want to spend a fortune on a box. We would be happy if someone wanted to donate the box. Could you please let me know if you’d be able to help us and what it would cost?
Thanks, Janet Randall, Cambridge, Massachusetts