Building the Ratty Grotto
When a week after we took in a couple of stray rats and one of them had 10 babies, it was clear the cage I bought from Craig’s List wasn’t going to cut it. (These were tame white rats that had ended up outdoors, but the father was probably a wild rat).
Not knowing anything about rat ownership, I did a lot of Googling. I found this really cool website that describes how to build a "cage" out of a bookcase:
How to Build a Grotto.
I thought this looked incredibly cool, so decided undertaketo the ambitious project of building my own. It’s been about two years now since I built it, but what better project for a long Thanksgiving weekend than to finally document it. I’ll tell you what I did and also what I would do differently in hindsight.
The Bookcase
I searched Craig’s List for a suitable bookcase. I knew I wanted something with a solid back; not the cheapo pressed cardboard back. I also knew I wanted five or six shelves.
I found one for about 45.00. When I went to pick it up and told the owner what it was for, she thought that was a cool idea. I promised to send her some finished pictures (which I did).
Sorry, I don’t have a picture of it, but you can see it in the finished shots at the end. It’s about 7 feet tall, 2 feet wide, and 10" deep. It has six non-removeable shelves and was painted a muted green. Not knowing much about paint, I researched whether it needed to be repainted in special non-toxic paint in case they chew on it. Turns out regular indoor paint is fine. Paint is only toxic when it’s wet. Note: If you paint one yourself, allow a few extra days of drying time to be sure it’s cured before you put your little guys in.
The shelves were not wide enough to hold an exercise wheel big enough for a full-grown rat. In hindsight, I should have gotten a deeper bookcase with shelves further apart. I did later build an attached annex to house a wheel. Also the painted shelves are not as easy to clean as melamine or laminate would have been.
Also removable shelves would have been a lot easier to cut holes in.
Building the Doors
I knew I wanted multiple doors so that I could open only one section of the bookcase at a time, but building a door for every shelf would have been very tedious. I settled for three doors. The top covers three shelves, the middle covers one shelf, and the bottom covers two. I left the bottom shelf open for storage.
I used scrap wood to build them. I cut strips from 2 x 4s using a miter saw. The strips were about 3/4" thick and 1 3/4" wide. Then I made three picture frames by screwing them together at the corners. I used some corner braces I got at the local hardware store to try to keep them at right angles.
After the frames were assembled, I gave them a few coats of paint using normal indoor paint left over from when we painted the walls of the house.
I got smart when I built the doors for the annex. Instead of using scraps of wood, I went to Home Depot and bought pre-painted moulding. This will cut days off the project. Just make sure it is solid wood (not the pressed wood), it is painted on both sides, and it’s thick enough to accommodate screwing hinges and latches on. Moulding that’s 1" square or more at the thickest part should do fine. Also it’s much easier to attach them with corner brackets than by screwing them together.
Covering the Doors
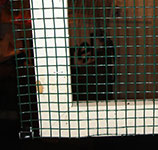
I covered them on the inside with hardware cloth from Home Depot. I’ve read that you shouldn’t use the galvanized kind because they can lick the coating off their paws and get zinc poisoning. Fortunately HD has stuff covered in vinyl. They might chew the coating off, but underneath is just regular, untreated metal. I cut the hardware cloth so that it covered the opening plus an inch or two more all around. Then I stapled it on using a staple gun.
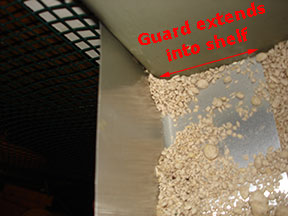
 Over time, my adventurous rattie Hoot (her sister is Annie. Hoot & Annie, get it?) pulled and plucked at the edges of ithe mesh, breaking where the wire strand was fused with the cross strand and bending the wire inward. This resulted in very sharp wires protruding in.
I later reworked the door so that the hardware cloth covers right up to the edge of the door frame on the hinged side and top/bottom, and goes past the door frame on the side that opens.
Since the inside box of the compartment is smaller than the outside perimeter because of the thickness of the walls and shelves, this means that Hoot can’t get to the edges and has nothing to work on. She can still get to the middle of the hardware cloth sheet, but so far she hasn’t been able to break anything apart.
Attaching the Doors
I put the bookcase down on the floor with the open side facing up. Then for each door, I put it in its correct place and screwed the hinges on the outside—one side to the back of the door and the other side to the side of the bookcase.
TIP: I went to the hardware store three times to buy hinges because they were the wrong size. Make sure you buy hinges that have the screw hole in the center. That way the screw won’t be too close to the edge of the wood.  Also measure the thickness of your door first. make sure the hinges are the right width so that the screw won’t be near the edges. Also if your bookcase has a curved edge, make sure the distance between the two hinge pieces is great enough so that the screw will dig into the flat part of the bookcase.
Also make sure you’ve put the door coverings on first so that when the hinge is screwed in, it will be for the correct door thickness.
Trapdoors Between Shelves
The Grotto had square holes cut in the shelves, and the square piece was hinged and attached to the side of the bookcase using a push latch. It also has a push latch on the bottom of the shelf. This means the trapdoor can be latched to the side when not in use, or latched closed to keep the rats on one shelf.
For variety, I decided to do the same in three shelves and cut a round hole in the other shelves, connected with 2" PVC. I used a rotozip tool to cut the squares. However since my shelves are not removable, I couldn’t get the square hole right up to the wall because the rotozip handle took up some room. Instead the square is an inch or so away from the wall.
This means that when the hinged trapdoor rests against the wall in the open position, it isn’t standing straight up against the wall, but is at an angle. I wanted to latch it in the open position to make sure it didn’t fall closed on its own, but it was really hard to latch it to the wall at an angle like that.
I ended up trying to use "hook and staple" hardward. You can find this at Home Depot or any hardware store. It’s easier to find if you know what it’s called.
The trapdoor worked ok when I wanted to close them on a shelf, but they tended to chew at it because they knew that was ordinarily the way down. It also got dirty in the open position since it wasn’t flat against the wall. So I made an improvement to all the shelves.
 I used a small section of 2" PVC pipe with couplers on each end to hold the pipe in place.
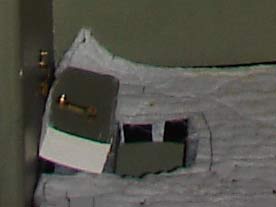
My square hole was too big, so I cut a piece of aluminum flashing bigger than the hole. Then I used a 2 1/2" hole saw to cut a hole in the flashing (2" pipe is really 2 3/8 including the walls but I couldn’t find a 2 3/8"hole saw). To make sure I cut the hole in the right place, I put the flashing in the grotto in its final place. Then I used a craft marker to trace the hole from beneath the flashing (a magic marker may have worked as well, but I found these great child pens called Craft-Star Jr. You can press the tips to load them up with the ink, so it’s really easy to write on unusual surfaces). When I drilled the hole, I just made sure I was within the marked square. If I were doing this project all over again, I would just cut a circular 2 1/2" hole in the shelf with the hole saw (or even 2 3/8" to fit the pipe exactly).
The coupler on each end holds the pipe in place securely, and it’s bigger than 2 1/2" which means it is bigger than the hole.
I also bought an end cap. Now when I want to lock them on a shelf, I open the door and replace the coupler with the end cap. They can’t get through it and they don’t chew it.
Hint: The easiest way to cut the right length of PVC is to use a mitre or circular saw. Various forums said you should put the blade in backwards, which I did faithfully. But this past weekend I made more modifications and I used the blade in the regular way—it worked fine. Just make sure you use a carbide blade with few teeth. Mine had 40 teeth.
Lining the Shelves
This proved to be the most problematic part of the project. The owner of the Grotto got his rats to use a litterbox, so his shelves stayed pretty clean. My ratties, however, never got the litterbox concept, so I had to clean the shelves constantly.
I lined the shelves with contact paper and taped the edges with electrical tape. But I still wanted a way to clean the shelves easily.
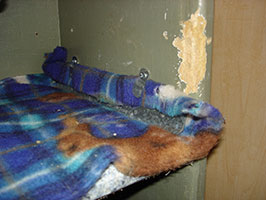
Cloth Linings
I decided to make linings out of scrap fabric. I cut the fabric to fit the shelves and cut appropriate holes for the trap doors. I made two sets so that I could replace the linings and toss the dirty set in the washer. (Tip: Fleece is one of the only fabrics that doesn’t unravel on a cut edge. So if you use fleece, you can just cut the edge, but if you use another fabric you should sew the edges to finish them. If you don’t care about the pattern, you can get pretty cheap fleece at a fabric store. I found that an even cheaper place is at Bed, Bath, & Beyond. They had a fleece blanket for about 10 dollars that was cheaper than the equivalent yardage of fleece at the fabric store.)
I used velcro to hold the linings in place. You want one side of the velcro to be the stick-on kind for the shelves and the other side to be the sew-on kind for the washable linings. (Tip: use the eye side for the fabric so that it doesn’t get caught on other fabric in the washer). Note: Do not try to sew the stick-on kind onto the fabric because the glue will muck up your sewing machine needle. Tip: The best place to get velcro like this is the Fabric Place or probably any fabric store. The Fabric Place has big rolls of velcro, so you can buy a length of the sticky kind and a matching length of the sewing kind. If you’re going to make two sets, get twice as much of the sew-on eye side.
I’ve found the easiest way to match them up is:
- Cut equal lengths of both sides of the velcro.
- Sew the velcro on the fabric.
- Press the sticky velcro against its matching side. Then peel the backing off the sticky velcro.
- Put put the fabric in place on the shelf and firmly press down on the velcro. By the time you need to pull the fabric off for washing, the velcro will firmly stuck.
With all this work, I’m sad to say it was a flop. Hootie left it alone at first, but then it became clear the game was to remove as much velcro as possible. The linings ended up in a heap and the velcro in shreds.
 The next thing I tried was to hold the linings in place with flat metal pieces. I have no idea what these things are called, but Home Depot sells them. They’re in the contractor section and they happened to be exactly the length of my shelf depth, 9". So I recut the linings so that they were about 4" longer than the length of the shelves.
 I wrapped the excess around the metal piece, put the metal piece against the bottom of each side wall, and screwed metal mirror holder clips to hold them in place. My idea was that I could unscrew the mirror clips to loosen them, rotate them off the metal pieces, and remove the linings.
Again, a dismal failure. I don’t know how Hoot was able to remove the linings that were held so tightly to the side walls, but she could. I also decided that fabric linings really have to be washed every few days because they don’t control odor.
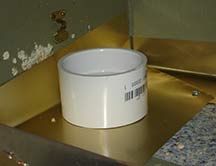
Litter on the Shelves
So next I tried to figure out a way to put litter on the shelves.
I decided to make litter guards out of flashing. I started with a 6" wide roll of flashing from Home Depot. I cut it so that when folded length-wise down the middle, one half was the length of the shelf and the other was wider so I could screw it to the sides:
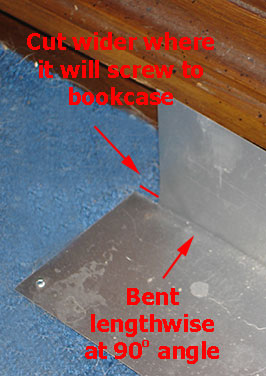
Litter Guard Cut
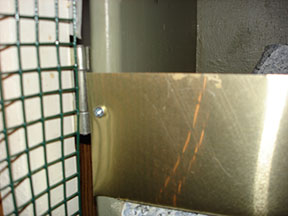
Litter Guard Screwed to Bookcase Side
Litter Guard from Inside Shelf
It seems to work well for a while. But litter still got under the guard and spilled everywhere. And removing the dirty litter from the shelf wasn’t easy without making a mess. Also folding the flashing is very difficult. I had to build a special device (two pieces of wood hinged together), but the fold was often crooked.
What I really wanted to do was line the entire shelf with flashing. It’s easy to clean and can’t be chewed through. But you really need to fold all the edges so that they aren’t sharp, and this isn’t easy to do. Also the flashing only comes 6" wide.
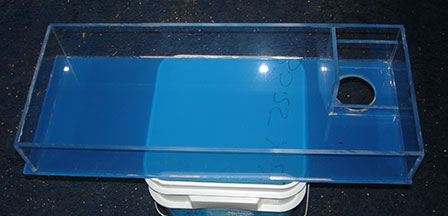
Plexiglas Shelf Liners
My latest and greatest idea was to make shelf liners out of plexiglas—little boxes that exactly fit the shape of the shelf. The boxes would hold the litter and would be easy to clean. All I have to do is take the box out, dump the litter, wash it in the bathtub, and replace everything.
It was a project on Thanksgiving weekend that trumped completing this post. But I’m happy to say it was mighty successful.
I did manage to finish this post eventually (blizzard weekend project) and to post about How to make shelf liner boxes from plexiglass.
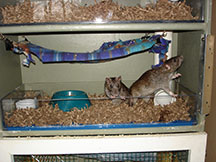
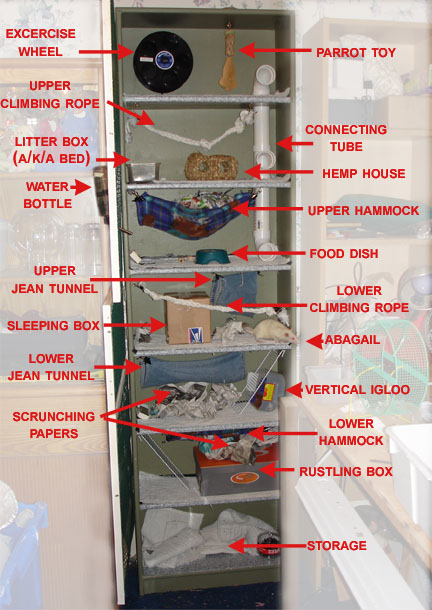
Here’s the completed Grotto (before some of the "What I Would Do Differently" improvements):