Building the Ratty Annex
One shortcoming of the Ratty Grotto is that the shelves are too shallow for an exercise wheel. And Hootie has a lot of enthusiasm (evident with all her escape attempts). So decided to build an extension. My ulterior motive is to have a place where I can video them testing out different exercise wheels and post my findings.
We just happened to have a bookshelf already standing next to the Grotto. Well, actually it’s half of a cabinet. My husband (at the time) bought a replacement free-standing cabinet without measuring (“They’re all a standard size”) which turned out to be double the depth of the old one and wouldn’t fit in our space. So one day while he was out, I used a table saw and cut it in half. Came out pretty well, but only one half has a door. The other is perfect for the annex.
The Back

The first problem is this cabinet has a fake back; just a thin flimsy piece of decorative wood, probably 1/8″ thick. Hootie will chew out of that in no time.
So I screwed some plywood on as an extra deterrent, just for the single shelf I’m using (I’ll have to add more if I expand later). Thought also this added weight will offset the weight of the door so hopefully I won’t have to bolt it to the wall like I did the original Grotto to keep it from tipping over.
The Door Frame
Last time with the Grotto, I built the doors out of scrap wood which I painted to protect them from pee. That added a couple of extra days on the project.
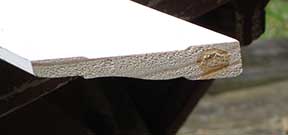
This time I got smart. I went to Home Depot and bought some moulding which was already painted. You can buy it by the foot: mine cost .59 per foot. Just make sure
- it is solid wood (not the pressed wood)
- it is painted on both sides
- it is thick enough to accommodate screwing hinges and latches on. If you look at a cross piece of the moulding I got, there’s at least 1″ of wood before all the decorative scallops.
I cut 45 degree cuts with my trusty wonder saw (a Hitachi mitre saw my husband got me for a gift. Gotta love our relationship: I get the power tools and he gets the cookware). At first I started to screw them together at the corners, but decided I didn’t want to split the wood since I have such a small area to work with. Instead I attached them using corner brackets.
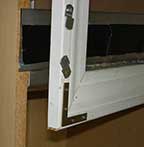
Another thing I did differently from last time: I discovered Hoot chews where she sees light. In the original Grotto, the bottom of the door frame came to the middle of the shelf, but this meant that if the door wasn’t closed tightly because some litter collected on the top of the door below, Hoot would chew the bottom of the shelf in an effort to escape.
So this time I staggered the door. The bottom of the frame comes a few inches below where the shelf ends, and the top is slightly below that shelf. So far that’s enough to make the crack of light less obvious to Hootdini. I also put some flashing on the end of the shelf, just in case.
The Door Mesh
I want to be able to take videos of my munchkins using their wheel. I think plexiglass would be better for this. However since the ratties can chew through plastic, I want it to be metal for the rest of the time. So I want to be able to exchange easily hardware cloth with 1/2″ squares and plexiglass.
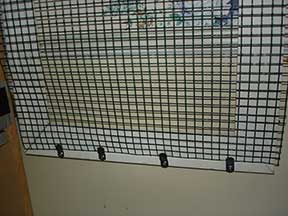
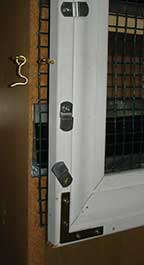
Don’t know if this will last for the long-term, but here’s my solution: both pieces are being held in place mostly from the pressure of the closed door against the frame. I used 1/8″ metal mirror hangers (Onyx has some that Home Depot sells) on the inside bottom of the door frame for the piece to rest on.
This was another good reason to have the frame end lower than the shelf; the metal clips are not squashed against the shelf when the door is closed.
Note: as first I thought I would have the pieces on the front so that they are easily changed without opening the door (which is why the photos show clips on the front as well). But realized that wasn’t a good idea because the scallop of the moulding means the mesh doesn’t lay flat against it totally; another chewing enticement.
I made sure I cut the piece big enough so that it overlaps the frame of the cabinet. So now I should be able to switch the mesh and the plexiglass easily. Then I attached the hinges and two gate hooks.
Litter Guards for the Shelves
I wanted some way of keeping litter on the shelves. In the original Grotto, I used metal bars (don’t know what they’re called, but Home Depot sells them) but they didn’t work so well. They weren’t that tall, they had holes in them (probably because of the construction use they’re really intended for) and Hoot could still pull them inside the cage.
So this time I decided to build some using flashing.
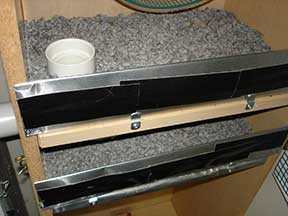
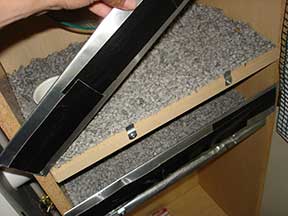
I cut flashing 5 inches high and long enough to rest against the door frame on each side without obscuring the hinges of the gate hook. Then I bent approx. 1 inch down along the top and bottom so that they aren’t sharp. I used gorilla tape cover the edges facing out, just to hold them down so they wouldn’t rub against the mesh of the door.
I screwed more mirror clips into each shelf to help hold them in place, then screwed one end of the flashing to the door frame. This way I can lift it up when it comes time to change the litter, and just sweep the litter off the shelf into a container.
Linking the Two
This was the hardest thing to figure out. The easiest thing would be to cut through the side walls of each. But the only tool I had was a RotoZip. I’ve discovered it’s hard to make steady cuts, and I wanted the hole to exactly match whatever I used as a tunnel to deter Hoot from chewing around the hole.
So after walking up and down the aisles of Lowes and Home Depot and pondering, I decided on this:
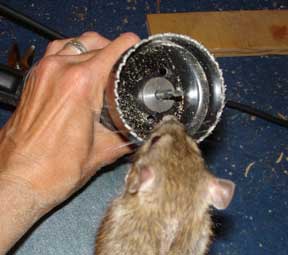
I bought a hole saw to cut the hole and a 2″ PVC pipe for the tunnel. A hole saw is not actually a saw as the name implies. It is an attachment that can be used on different things, including a drill.
Mistake #1: I thought a 2″ pipe meant I wanted a 2″ hole, so I bought a 2″ hole saw. Not the case. 2″ PVC pipe means the opening is 2″ but the actual diameter of the pipe is 2 3/8 which includes the walls.
I found that the cheap kind doesn’t come in 2 3/8″ size, which is ok. I got a 2 1/2″, which gave me some wiggle room in case the two holes didn’t exactly line up (which they didn’t). But since I wanted to cover up that extra 1/8 gap, I bought 2″ PVC connectors for connecting the same size pipe. They’re larger than 2 1/2 so they’ll cover the gap. I also bought an end cap for putting on the end of the tunnel when I want to keep them on one side.

I had another problem. I had already drilled a 2″ hole. When I tried to enlarge it to a 2 1/2″ hole, I found it’s almost impossible to line up the larger hole saw with the smaller hole correctly, so I ended up with a hole shaped like a circle with a crescent added on. D’oh! Definite chewing enticement.
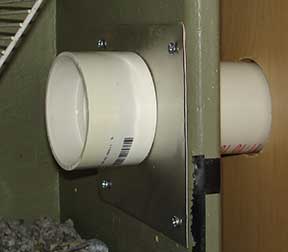
So I covered up the extra crescent with flashing. First I cut a flashing square and cut corners out. Then I folded about 1/2″ of each side over so that the edges aren’t sharp. Then I used the hole saw again to cut a hole in the center (actually I measured first to make sure it wouldn’t protrude past the wall of the cabinet.) I screwed the flashing to the sides of each cabinet, cut the PVC pipe so that the pipe plus the two connectors would exactly fit the distance, and viola! A PVC pipe tunnel held snugly in place by the connector on each end.
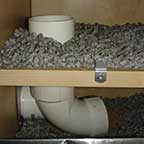
The annex has an adjustable shelf in the middle. I attached the exercise wheel to the ceiling of the top compartment with tea cup hooks that screw into the wood. I may have to adjust the height of the shelf depending on the wheel that I have my ratties test. But for now, I drilled a hole in the shelf and used more 2″ PVC pipe, a connector, and a 90 degree elbow for a passage up. (I could have just drilled the hole, but I wanted a way to keep the litter in the top compartment.
The End Result

Well, the annex was a big success. I thought the nifflers may have forgotten how to run in a wheel because they’ve been without one since they were little, but within 30 minutes, Annie was running around like an old pro. And Hootie hasn’t chewed at all. Priscilla has been through the tunnel to the bottom level of the annex, but hasn’t ventured up the tube to the top.
Does my video studio work? Judge for yourself: